27th May, 2023 by Arif Sardar
NextJs, sanity.io, Tailwind CSS, Next Auth,
4 min. read
468 visitors677 views
Table of Contents
I am thrilled to announce the launch of the third version of my personal portfolio website and blogs! Although there was nothing wrong with the first two versions, I felt the need to embrace the latest advancements in technology and design to ensure that my portfolio remains relevant, engaging, and user-friendly. With this in mind, I embarked on a journey of revamping and upgrading my portfolio to bring you a truly exceptional browsing experience.
If you're considering starting a dev blog, it's understandable to feel overwhelmed by the plethora of tools and technologies available. As we live in an era of abundance, there is no shortage of options to choose from.
In this article, I will explain how my blog functions, enabling you to create something comparable for yourself. Additionally, I will address the most commonly asked questions I have received throughout the years. It is not a step-by-step guide, but it will provide you with a general plan to follow.
The code for the website is not public yet. But I am working on to make the code available in my GitHub account. For now it's a closed-source project.
#The Purpose Behind this Blog
The motive behind creating this blog website is to foster a vibrant community where we can engage in meaningful discussions, exchange knowledge, and inspire one another in the vast realm of technology, creativity, and personal growth.
1. Sharing Knowledge and Expertise:
As a passionate individual immersed in the world of technology and innovation, I find immense joy in exploring the latest advancements, tools, and methodologies. Through this blog, I aspire to share my knowledge and expertise, offering valuable insights into various topics related to web development, software engineering, design, and more.
2. Showcasing Projects and Creativity:
Creativity fuels my soul, and this blog will serve as a platform to showcase my projects and creations. From web applications and design prototypes to personal projects that push the boundaries of imagination, I am excited to share the fruits of my labour and the stories behind their development. I hope that these projects not only inspire you but also encourage you to embark on your creative endeavours.
3. Fostering Curiosity and Innovation:
Curiosity is the driving force behind progress, and innovation is born from the seeds of curiosity. With each blog post, I seek to ignite your curiosity and encourage you to question, experiment, and challenge the status quo. Together, let's push the boundaries of what is possible and create solutions that make a difference in the world.
#The Tech Stack
In the dynamic landscape of web development, choosing the right tech stack is crucial for creating a robust and high-performing web application. This blog post delves into the intricacies of "The Tech Stack" – a set of technologies and frameworks that serve as the foundation for crafting a cutting-edge web experience.
1. Next.JS V-13 (A Fullstack Framework):
At the forefront of "The Tech Stack" is Next.js V-13.4, a powerful full-stack framework that unifies frontend and backend development. With its latest version, Next.js V-13 introduces a range of advancements, including lightning-fast performance through server-side rendering (SSR) and automatic static optimization. The integration with Tailwind CSS and styled-jsx empower developers to create captivating and responsive user interfaces effortlessly.
Developed by Vercel, an exceptional team dedicated to continuous improvement, this update comes packed with features and enhancements that will undoubtedly revolutionize the way we build web applications.
From performance optimizations to enhanced developer tools, this update represents a significant milestone in web development, empowering us to create exceptional web experiences with unparalleled speed, flexibility, and efficiency.
I have chosen Vercel to host my blog. My decision was influenced by the fact that they are the creators of Next.js, which I believed would lead to optimal performance. I must say, their platform is amazing. In fact, I have even migrated some of my projects that are not Next.js based to their platform.
2. Sanity CMS (Effortless Content Management):
Content is at the heart of any web application, and that's where Sanity CMS comes into play. As the second pillar of "The Tech Stack," Sanity provides a seamless and efficient content management system for your projects. Its intuitive interface and customizable data models enable you to structure, organize, and edit content with ease. Whether you're managing a blog, an e-commerce platform, or a portfolio, Sanity CMS streamlines the content creation and publication process, empowering you to focus on delivering exceptional user experiences.
Furthermore, this platform offers a comprehensive dashboard called Studio, which enables users to create, edit, or upload documents of various categories. Moreover, it allows up to three non-admin users to manage content and provides a generous free usage quota. Under the free tier, users can add up to 10,000 documents in each of the two datasets.
Integrating with Sanity APIs can help create a strong foundation for your content architecture. By keeping up with the latest technologies, you can unlock new opportunities for innovation. With the ability to synchronize content between your Content Lake and other sources, you can gain unprecedented access, reuse, and efficiency.
3. Tailwind CSS (Elevating the Art of Styling):
One of the key pillars of my upgraded portfolio is the integration of Tailwind CSS, a powerful utility-first CSS framework. Tailwind CSS has revolutionized the way I approach styling in web development, offering a highly efficient and flexible approach to crafting visually stunning user interfaces.
Tailwind CSS embraces a utility-first approach, providing an extensive set of pre-defined utility classes that you can easily apply directly to your HTML elements. While it comes with a comprehensive set of utility classes, it also allows me to create custom styles tailored to my project's specific needs. This level of customization ensures that my portfolio maintains a unique visual identity while adhering to consistent design patterns across different sections.
Creating responsive designs is essential in today's multi-device world. Tailwind CSS simplifies the process of building responsive layouts with its intuitive class naming conventions. Tailwind CSS follows a "just-in-time" (JIT) philosophy, meaning it only generates the CSS classes you use in your project. As a result, the final CSS bundle is optimized and lightweight, leading to faster loading times and improved performance.
The Previous Versions Of My Portfolio:
Before arriving at the current version of my portfolio, I embarked on a journey of growth and learning through various iterations. Each previous version represented a stepping stone in my development as a web developer and a creator. Though there was nothing inherently wrong with those versions, I recognized the need for advancement and improvement to stay at the cutting edge of technology and design.
CodeWithArif (code-with-arif.github.io) (Working…)
CODE WITH ARIF (code-with-arif.vercel.app) (Deprecated)
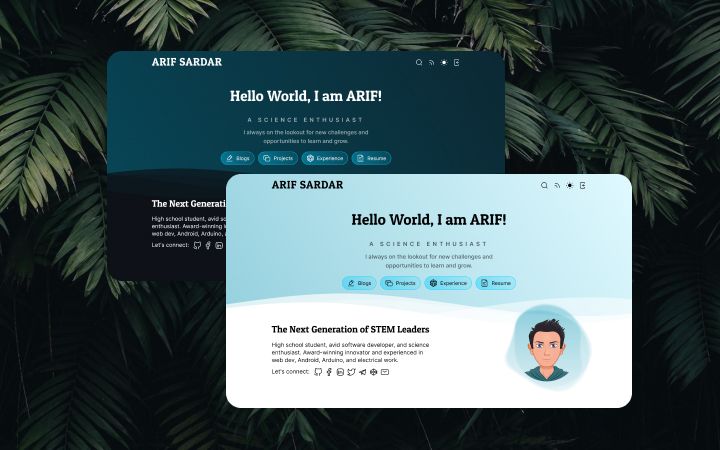
#Designs
Although I am not a professional graphics designer, I've tried my best to make the website professional, interactive, engaging, user-friendly, and relevant. Keeping it in mind, I started designing the portfolio in Figma. Luckily I had enough experience in Figma and CSS. So, It was pretty easy for me to bring my thoughts into existence and convert that to CSS.
But it was tricky to implement theming Capabilities. I have used cookies to store the current theme (dark/light) for individual clients. Through Next.js 13 /app dir, I was able to fetch the theme cookie directly in layout component. Then I set the classname of the body the tag according to the theme.
Tailwind CSS for styling:
Next.js 13 takes design to a whole new level by seamlessly integrating with Tailwind CSS, a highly customizable CSS framework. With Tailwind CSS, you have unparalleled control over the visual styling of your application. Leveraging Next.js' support for Tailwind CSS, you can effortlessly create stunning and unique designs, achieving the perfect balance between aesthetics and functionality.
What inspired the design?
As I was constructing it, I was unsure of the inspiration behind my creation. However, it has become clear to me now. The design and colour scheme is reminiscent of Matt Fantinel's work. I got the idea to build a fully interactive and well-kept portfolio from Sonny Sangha, and Josh Comeau's website was immensely helpful in bringing this project to life.
Once I had finished designing the website, I began building it using code. For this task, I rely on the VSCode Editor (Visual Studio Code), which is developed and maintained by Microsoft. It includes features such as source management with GitHub and an in-built terminal, which make managing larger projects like this one much simpler.
The Wave Animation:
Have you noticed the wave animation in the header and footer sections of the homepage? I personally appreciate this background over any image as it is simple, easy to look at, and visually pleasing. This animation is powered by CSS and is actually an SVG animation.
If you're interested in the code, it can be found on my Github Gist.
#Blogs
However designing part was done smoothly, the blog section and functions were a challenging part of this build. It required much effort to set up database configuration, custom editor, routes to handle editing and proper styles.
Initially, I used the default Block Editor or Portable Text editor from Sanity Backend to store and edit or create blogs. It was pretty fine until I discovered the issue with the Editor on mobile devices or touch devices. So, I quit the default editor and switched to CKEditor, while still storing all data to sanity.
CKEditor Configuration:
I have built a custom CKEditor build with the help of the CKEditor online builder. Next, I used @ckeditor/ckeditor5-react to initialize the custom build editor. After that, I could use it as a component in Next.js 13. But before that, I had to set up the toolbar configuration.
Content Styling:
For styling the content of the blog posts, I additionally added a content.scss file and added all the styles under the class ck-content, as it was the default class given by CKEditor. Later I added the same className while rendering the exported HTML. Also, the proper colour palette for both light and dark modes was also a challenging task to set up.
For more information on how to use CKEditor with Next.JS follow this article: Integrating CKEditor5 in Next JS: A How-To Guide
#RSS setup
RSS (Really Simple Syndication) is a web feed format that allows users to subscribe to and read web content in a variety of formats. RSS feeds are typically updated frequently, so users can stay up-to-date on the latest content from their favourite websites.
Unfortunately, Next.js doesn't provide any features for RSS feeds. So, I created a route named /rss.xml and send the client the RSS feed in XML format. For that, I had to fetch all blog posts and then add them to the RSS feed.
I have created the route in GET method. So, only GET requests from the client can fetch data from the route. You can visit the rss.xml of this website.
#Sitemap Setup
Fortunately, the sitemap was built-in into the new Next.js 13. You can read the official documentation here. It’s great for SEO, especially for newer websites, so I created the generic sitemap as I had to add all my blogs to it, at the runtime. Here's the code for app/sitemap.ts that generates /sitemap.xml route. You can visit the sitemap.xml of this website.
#Conclusion
Upon completing the entire website, I have come to appreciate the decision of utilizing Next.js 13 and its latest features. Initially, my experience with Next.js was less than satisfactory. However, with the release of Next.js 13, I am amazed by the plethora of features and enhancements it brings, which undoubtedly revolutionize the web application development process. The improved performance, image optimization, enhanced developer experience, seamless integration with Vercel, and the new routing system have significantly contributed to faster website loading, appealing visual aesthetics, and ease of maintenance.
Throughout the website development process, I encountered numerous errors and bugs. Fortunately, thanks to the extensive Next.js community, I was able to identify and resolve these issues. Moreover, I took the opportunity to share my learnings by documenting them in the blog section, providing valuable insights for others who may encounter similar challenges.
In essence, my primary objective was to create a simplistic, visually appealing website, efficient, user-friendly, and well-organized website. Moving forward, I intend to continue writing blogs on this portfolio and showcasing my open-source projects in the dedicated projects section, making it effortless for visitors to explore and engage with them.